 |
 |
 |
|
|
|
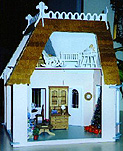
| Rear View
(Top left) |
David Scobey & House
(Top center) |
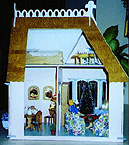
Second Rear View
(Top right) |
| About The Coventry Cottage and Furniture...by
David Scobey:
I found the Instruction Warmup Sheet both helpful and amusing. The amusing part was the bold face instruction, DONT PANIC!. I thought that was appropriate counsel when the box was first opened. Since I had assembled several kits of various types over the years, I assumed this would not be an insurmountable task, albeit the fact that this was my first doll house assembly. Furniture:
Doll House:
I used predominately hot glue for the assembly, with a couple of instances where wood glue seemed appropriate (plastic windows, etc.). The shingles were a challenge due to the shape of the roof and the need to keep the shingle lines exactly parallel. I decided to use a heavy wrapping paper for a template and then decided to apply the shingles directly to the template and glue the paper and shingles to the roof as one piece. I highly recommend this approach because it gives you a much better chance of cutting the proper angles on the shingles. The target audience for our doll house is our just turned four year old granddaughter. Consequently, I considered durability during construction. One deviation I made from the recommended instructions was to mount the Gable Trim directly against the side of the doll house walls. The appearance is basically the same and it prevents potential breakage of the trim. This decision required the top of the shudders to rest against the gable trim, which gives some depth to the shudder mounting, which we liked. After the doll house was constructed, my wife got creative with the decorations and created a Christmas motif, since it was a Christmas gift. She purchased small wreaths for the windows, decorated the tree and placed miniature packages under it. We added some small gold beads to the secretary type desk to give the impression of drawer pulls. She also upholstered the wing chairs, which gave a nice effect. The final touch was building a platform on which to sit the doll house allowing space for miniature plants and garden implements, which my wife added to spruce up the grounds. We placed the doll house on the platform and the platform on a small plastic turntable to allow our granddaughter access to all sides without having to place the doll house in the center of a room. Overall, it was a pleasurable experience and a lot of fun adding all of the extra decorating items. The smile on our granddaughters face on Christmas morning dimmed the memory of all of the sanding and painting. Congratulations
to Mr. & Mrs. Scobey for a job well done!
|
| David's Creative
Tip:
By using some of the scrap wood, you can form molding for the front of the house under the bay windows. See David's Comments on the Right Side of House... |
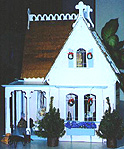
Side View |
"I
didn't like the way the joints fit together, so I painted small pieces
of "molding" that I cut out of the scrap wood and ran them horizontally
and vertically under the front bay -- don't know if you can see that much
detail in the
photo. It was a simple task and I liked the finished look it gave the front." |
[ Questions ]
[ Dollhouse Showcase Information ]
[ Greenleaf's Coventry Cottage ]