 |
Click: Creative Entrance |
 |
|
Click: Creative Entrance |
|
| Rear View
(Top left) |
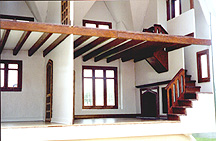
Entrance to House
(Top center) |
OutsideView
(Top right) |
| About The Glencroft ...by Jim Rieder:
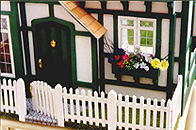
This Glencroft has taken me about 3 months working 2-3 hours a night. Since this dollhouse is going to one of our daughters for her daughter, I decided to let her decorate the rooms to their desire. Therefore all the interior walls are painted with a semi-gloss latex white enamel. The upstairs floors, interior windows and trim, fireplaces, mantels, bookcase, wood bin, stairs, banisters, inside doors and trim, and beams are stained with a provincial walnut stain and varnished with three coats of semi-gloss polyurethane. The living room has a black walnut hardwood floor laid and varnished and I added baseboards stained and varnished in the two bedrooms and livingroom. The kitchen floor was left just varnished and the baseboards painted white ready for whatever they want to do with the floor. Ideally, the flooring should be laid before the baseboards are installed. I painted the fireplace hearths and a front sidewalk approach to the door a gray color, used an indelible pen to draw simulated slate and then applied an acrylic varnish over this.You could apply any of the stone or brick products available to these areas and also the exterior of the chimney. I decided not to electrify this dollhouse since this was my first effort. The exterior is painted in an off-white acrylic mixed with a fine grit to simulate stucco. We chose a green color to use on the exterior trim with an offsetting green for the front door trim. We just happen to like this better than the traditional brown found on most Tudor houses. On the roof I cut a decorative design into the top row of shingles to emulate thatching and covered each roof ridge with individual shingles to give a more finished look. I soaked these shingles in water so they would bend without breaking and then glued them with tacky glue and taped them down with masking tape. Worked very well! I decided to leave the shingles their natural color however I applied two coats of clear sealer which darkened them down a little. This house, with its front English Garden, is mounted on a larger base to give room for side yards and a larger front yard. This base is then mounted on two additional smaller pieces of plywood with a turntable attached between them. I edged the base with wood and painted it the same stucco finish as the house. The front fence is painted the same color without the grit. The yard is a foam material that comes in one piece that can be cut to fit whatever space necessary. I'm leaving any additional landscaping to our daughter since there is enough space to add bushes, trees, vines, hedges or flowers as she desires. This was a lot of fun, challenging
at times, but I am proud of the finished product.
Congratulations
to Mr. Rieder for a job well done!
|
| Jim's Creative
Tip:
I painted the fireplace hearths and a front sidewalk approach to the door a gray color, used an indelible pen to draw simulated slate and then applied an acrylic varnish over this. See Jim's Comments on the Right Side of House... |

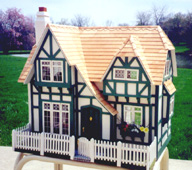
Front View Click: Other Photos |
<
Roof is Darker from Indoor Photo
"On the roof I cut a decorative design into the top row of shingles to emulate thatching and covered each roof ridge with individual shingles to give a more finished look (click to see). I soaked these shingles in water so they would bend without breaking and then glued them with tacky glue and taped them down with masking tape." |
[ Questions ]
[ Dollhouse Showcase Information ]
[ Greenleaf's Glencroft ]
Showcase Four Opened in May of 2000